
StitchPort™ Quick Installation Guide
This guide covers the first-time setup process, from connecting the device to your embroidery machine to configuring it to join your local Wi-Fi network using “Client Mode” in the software.
Network Configuration
- Remove StitchPort and the included Micro USB cable from the packaging. Connect the Micro USB end of the cable to the StitchPort, and the standard USB end to your embroidery machine.
- Ensure that the embroidery machine connected to the StitchPort is positioned within the coverage area of your local Wi-Fi network.
- Once the StitchPort is connected, allow a few seconds for the device to power on.
- Upon startup, the StitchPort will broadcast its own wireless access point named “StitchPort”.
- For this initial setup, you must temporarily connect your computer to this access point:
Connect to the access point:- Windows: Locate the Network/Wi-Fi icon in the system tray (bottom-right corner of the screen). Click it to reveal available networks.
- macOS: Click the Wi-Fi icon in the menu bar (top-right corner).
- Scroll through the list of available networks and select the StitchPort network.
- Click Connect. When prompted, enter the Wi-Fi Password
1234567890and click Next or Join. - Once successfully connected, you may notice a temporary loss of internet access on your computer.
- Open your embroidery software to configure the StitchPort to connect to your local wireless network.
- Navigate to the StitchPort configuration menu:
- Windows: Select menu “Tools” → “Options” and go to the StitchPort tab.
- macOS: Select menu “Preferences” and go to the “StitchPort” tab.
> Note: If the “Preferences” option appears grayed out in macOS, create a new design first to activate this option.
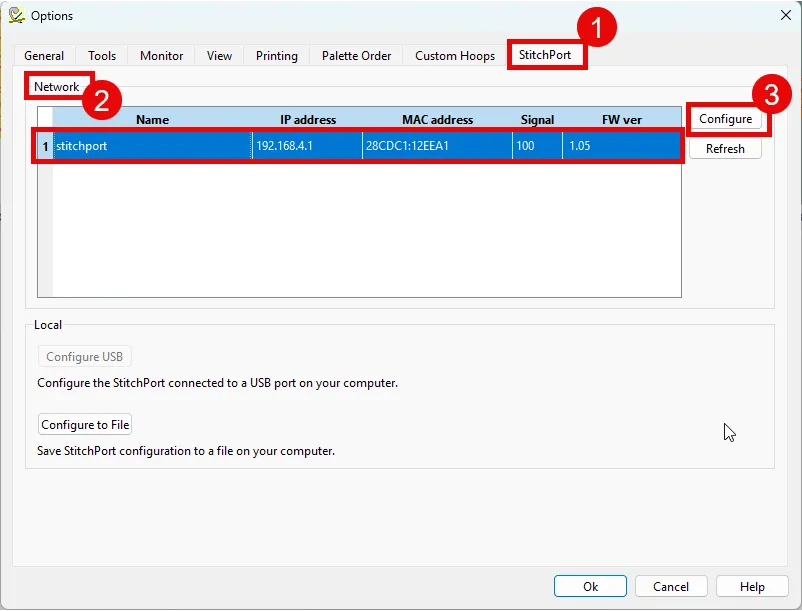
- In the StitchPort tab, under the Network section, select the listed StitchPort device and click the Configure button.

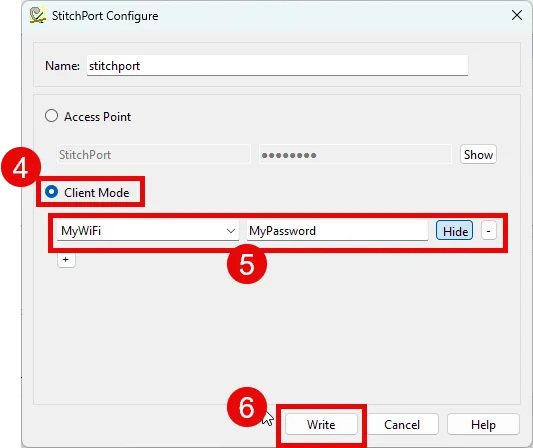
- In the configuration dialog box that appears:

- Enter a descriptive name for your embroidery machine.
- Select the “Client mode” radio button.
- Enter your local network name (SSID) and password.
- Click the [Write] button to save the configuration.
- Disconnect the StitchPort™ from the machine and reconnect it to apply the new configuration.
- When configured properly, the status light will blink.
- StitchPort is now connected to your local network and ready for use with your embroidery machine.
How to Send a Design to StitchPort
To send a design to the device, navigate to File → Export → To StitchPort.
- Select the desired StitchPort from the dropdown menu.
- Enter a name for the design and press Send.
- The design is sent to the StitchPort attached to your embroidery machine and is ready for production.
Local Configuration
If you need to configure the StitchPort for a wireless network you are not currently connected to—but you know its SSID and Password—you can pre-configure the device on your computer before moving it to the embroidery machine.
- Connect the StitchPort to an available USB port on your computer.
- Launch the software.
- Navigate to the StitchPort configuration menu:
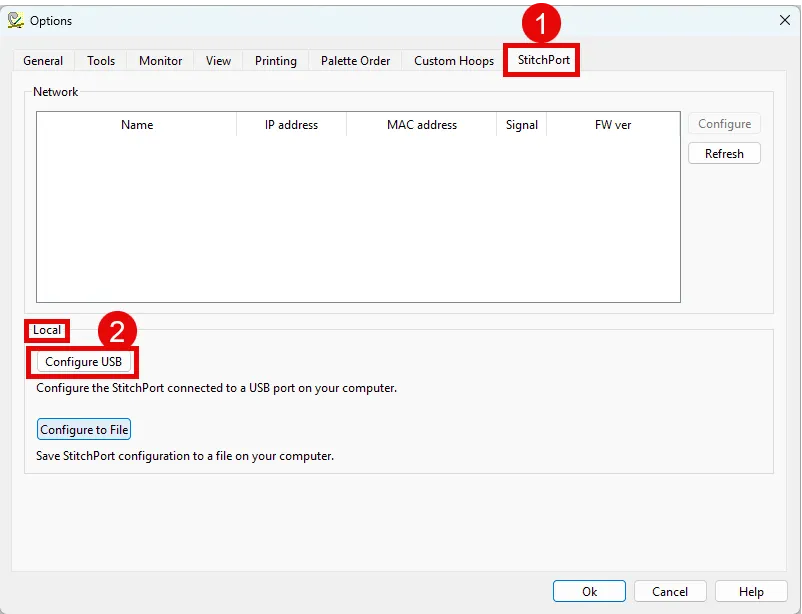
- Windows: Select menu “Tools” → “Options” and go to the StitchPort tab.
- macOS: Select menu “Preferences” and go to the “StitchPort” tab. > Note: If the “Preferences” option appears grayed out in macOS, create a new design first to activate this option.
- In the StitchPort tab, locate the Local section and click the [Configure USB] button.

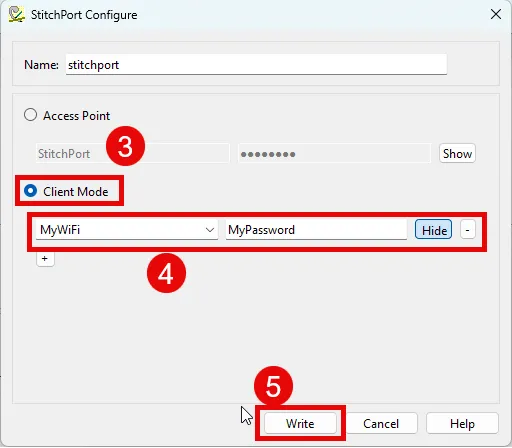
- In the configuration dialog box that appears:

- Enter a descriptive name for your embroidery machine.
- Select the “Client mode” radio button.
- Enter the target network name (SSID) and password.
- Click the [Write] button to save the configuration.
- Disconnect StitchPort™ from the computer’s USB port, move it to the embroidery machine, and connect it. The device will update with the new configuration upon connection.
- When configured properly, the status light will blink.
- StitchPort is now connected to the defined local network. It is ready for use with your embroidery machine and can receive designs from any computer on the same network.
Troubleshooting Connection Failures
If the StitchPort status light remains solid (always on), it indicates that the device could not connect to the wireless network and is not acting as an access point. This means the configuration has failed. You must re-configure the device by repeating the Local Configuration steps described above.